Happy Easter

Hi crafty friends and welcome back to my card corner. I am finally getting back into a normal routine after the long summer holidays here in Australia, so you will start seeing more posts here from now on. Yay!! I am so pleased to be back with a card featuring one of the gorgeous digital stamps from the new RAM Stamps February release. There are four new stamps which are all adorable along with some stunning new digital patterned papers. So let’s get started on the card…..

For today’s card I will be using the super sweet Bunny’s Bike digital stamp. I started off by downloading the image onto 80lb white cardstock. I then coloured the image with Copic markers and fussy cut.

I then moved onto the background. I stamped a background stamp called Woodland Background from Purple Onion Designs and coloured it with Copic markers. I stamped a Happy Easter sentiment using black dye ink and die cut using the Stitched Rectangle Die-Namics from My Favorite Things.

For the Copic colouring I have used the following colours – YG63, YG61, E44, E43, E42, E41, W4, W2, W0, W00, Y18, Y15, Y13, Y11, R85, R83, BV00, BG23, BG10, R30, C6, C4, C2, Go2, G00, G000, G0000, E55, E53, E51, E50, B00.

I cut and scored a card base to measure 4.25 x 5.5 inches and die cut a panel of white card stock using a slightly larger Stitched Rectangle die. I glued these two together and then added to the coloured panel with foam tape. Lastly I added the bunny with foam tape.

That completes the card for today, I hope you love it as much as I do. Head over to the RAM Stamps website to check out the complete release, it’s fantastic!

Thanks again for visiting…. xx

Disclosure – As a member of the RAM Stamps design team, the RAM Stamps products used in this post have been gifted to me, free of charge. All other items used have been paid for in full by myself.

Crafty Kickoff!!!

Hi crafty friends, Thank you stopping by once again, I really appreciate it. Today it is week two in the 2024 Crafty Kickoff Cards hop and the theme for this week is – birthstones!! My birthday is in July, so my birthstone is a ruby! Lucky me… I love the deep, dark red of a ruby. This is a such great theme, with so many ways to be creative. I decided to do a 10 minute card challenge with this one, so let’s get started……

To start the card, I cut and scored some dark red cardstock to create a card base that measures 4.25 x 5.5 inches. I trimmed of the corners with a corner cutter. I then trimmed a panel of white cardstock to measure slightly smaller and again, rounded off the corners. I glued these two together.

On another piece of dark red cardstock I used the Book Cover Engravings Embossing Folder from Altenew. I trimmed the panel down to 4 x 5.25 inches and rounded the corners. I brushed over the top of the embossing with white pigment ink, which adds some shading.

I then heat embossed a Happy Birthday sentiment with gold embossing powder and added a white panel to the back, this was then glued to the panel. I glued the embossed panel onto the card base and added the sentiment. Finally, I added a few dark sparkly gems.

This completes the card for today. I hope you might be inspired to create a card with the colours of your birth stone!!

Thanks again for visiting…… xx

Mr & Mrs Clause

Hi crafty friends, thanks again for visiting. I appreciate all of you that support support and encourage me and my card corner. Today it is new release day at RAM Stamps. If you are looking for some super cute Christmas images then this is the release for you. Let’s get started on today’s card…….

I started off by creating the card base using 110lb Neenah cardstock to measure 4.25 x 5.5 inches. I then trimmed a smaller panel using the MFT Stamps Stitched Rectangle Die-Namics. I glued the two together and set them aside. I them die cut another slightly smaller panel of white cardstock and ink blended some Salvaged Patina Distress Oxide ink from the top, fading to white mid way down the panel. I then stamped the sentiment at the bottom of the panel in red dye ink.

I then moved on to the Mr & Mrs Clause image. I printed the image and coloured using Copic markers. For this image I have used R29, 27, 24, 22, 30, C7, 5, 3, 1, E21, 51, 50, Y15. I fussy cut the image and set aside.

I assembled the Build A Snow Globe die from Lawn Fawn, added some white gel pen snow and then added Mr & Mrs Clause. Lastly I added the snow globe to the panel and then assembled all the panels to complete the card.

I hope you might be inspired to get crafty some time soon. Make sure to head over the the RAM Stamps website to see the whole release.

Thanks again for visiting…… xx

Disclosure – As a member of the RAM Stamps design team, the digital images used in this card post have been gifted to me free of charge. All other items used in this post have been purchased by me at full price.

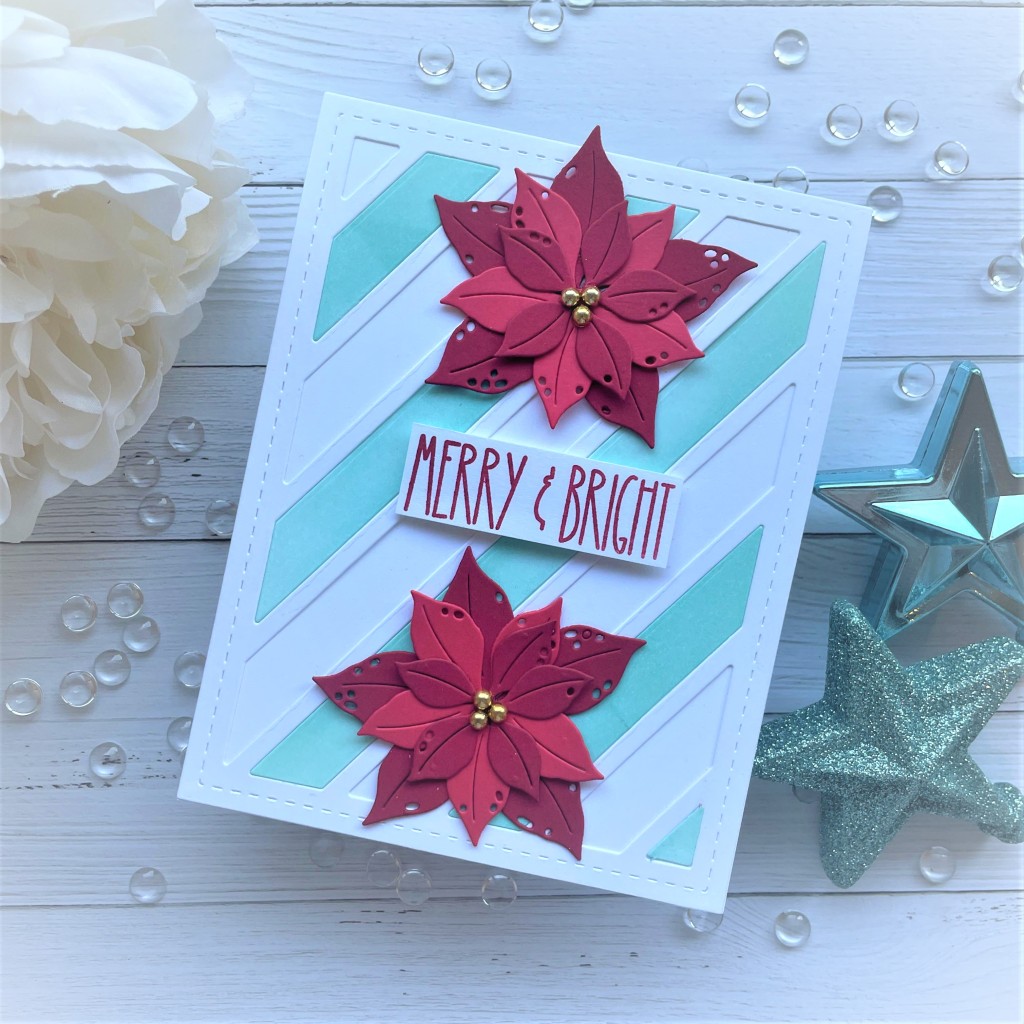
Merry & Bright

Hi friends and welcome back to my blog. I am so happy to be back with week 5 of the Winter Wonderland Card Hop. This week the theme is Plaid Poinsettia – this can be plaid or poinsettia or a mixture of both. So many creative options. I opted just for the poinsettia. You can see the rest of the amazing cards from the hop on Instagram using the hashtag – winterwonderlandcardhop2023. For my card today, I have chosen to use products from Waffle Flower. Let’s get started on today’s card.

This image has an empty alt attribute; its file name is 399940220_1465008427397832_1137732138795323414_n-2.jpg

So to start the card, I created a card base to measure 4.25 x 5.5 inches using 110lb cardstock. I then die cut the Waffle Flower Diagonal Stripe Die in white and teal. I added the white frame to the card base and the glued in the teal stripes on every other stripe. I left the white stripes without an inserted piece to create texture.

I then die cut the Waffle Flower Layered Poinsettia Die in two shades of red cardstock. I glued the pieces together and added some gold beads to the centres. I added the poinsettia’s to the centre top and bottom of the card . For the sentiment I have used the Cozy Holiday Sentiments stamp also from Waffle Flower. I stamped the sentiment in dark red dye ink onto white cardstock, trimmed it down and added to the card using foam tape.

That completes the card for today, quick and simple but still a striking card. I hope you love this card as much as I do.

Thanks again for visiting….. xx

Christmas Wishes

Hi friends, thanks for visiting my card corner once again, I really appreciate you being here. Today I am continuing with the Christmas card theme and using an adorable scene from Amanda Jayne Designs. If you haven’t checked out Amanda’s digital images, I encourage you to, they are stunning!!! So let’s get started on today’s card…….

To start the card I printed the digital image using my Canon Pixma printer onto Neenah 80lb cardstock. I coloured the image using Copic markers, once dry I added white gel pen highlights. For the colouring I have used the following colours – BG78, 75, 01, R29, 27, 24, 22, 20, 30, C9, 7, 5, Y000, 00, 15, YR18, 16. I then Printed a mask of the image, added it on top and ink blended the background using Speckled Egg Distress Oxide Ink. I mixed some white gouache with clean water and added splatters to the image.

Once the image was dry I die cut the panel using the My Favorite Things Stitched Rectangle Die-Namics. I trimmed a slightly larger white panel of cardstock and added both of these to a teal card base that measures 4.25 x 5.5 inches.

I moved on to the sentiment which I stamped onto dark red cardstock using white pigment ink and heat set white embossing powder. I then die cut the sentiment using the My Favorite Things Speech Bubble Die-Namics. I added this to finish of the card.

I hope you like the card as much as I do and that you might be inspired to get creative some time soon.

Thanks again for visiting…. xx